| Make BestShareware.net your home page | Add BestShareware.net to your favorites |
 Homepage |
 Help Desk |
 Site Map |
 |
 Popular |
 What's New |
 Featured |
| MAC Software | Linux Software | Pocket PC | iPod Software |
|
How to merge several video files into a single file? Sometimes you might want to quickly join several video files you have into one without the need to edit or reencode them. Here we recommend a better video processing tool, called AVS Video Tools you can do that quickly and easily. It will let you merge several files into a single one automatically. You can also cut the unnecessary scenes from these video files before saving them. Here are Step-by-step Guide: Step 1: Download and install AVS Video Tools. Click here to download it. After the download is finished, run the AVSVideoTools.exe file and follow the installation wizard instructions. Step 2: Run AVS Video Tools and load the original video files After you launch the program, you can select your video files using the Add File(s) button. In the opened Windows Explorer Window browse for the necessary folder containing video files and select them with the mouse: 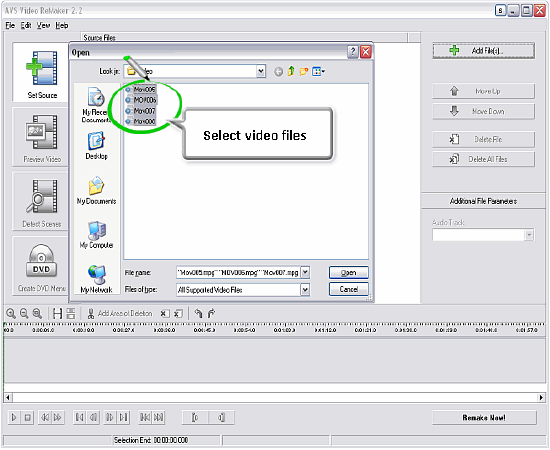 NOTE! If your input is a DVD disc, you will need to select the path to your source file: X:\Video_TS\Video_TS.IFO. "X" stands for your DVD-ROM or the hard disk drive folder where your DVD is stored. It is important to select the IFO file, rather than VOB file, because the IFO file contains the information about the entire DVD structure and this way you will avoid audio and video de-synch problems when converting. Also, most DVDs have several VOB files (files with actual video) and if you convert VOBs instead of IFO, you will have to merge them afterwards, which is not the case with the IFO files. 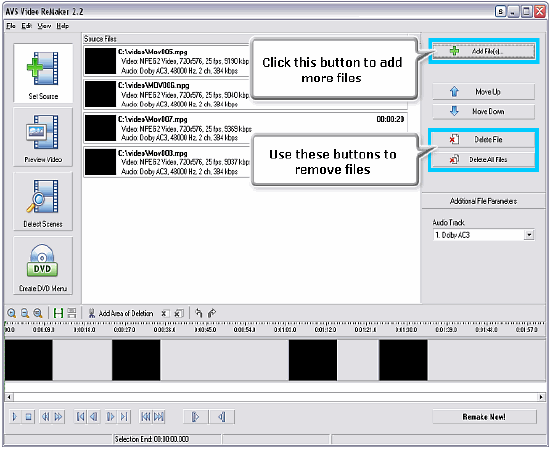 When the video is loaded, you can manage it using the Delete File and Delete All Files buttons to remove the video from the program and Add File(s) button to add more video files to AVS Video Tools. NOTE: in case you add several different video files to the program all of them MUST have the same parameters - video resolution, aspect ratio, frame rate and bitrate. You cannot merge MPEG2 and AVI files, for instance, or two videos of the same format but shot with different resolutions or bitrates. Step 3: Find the unnecessary scenes using one of the modes (optional) If you would like to delete one or several scenes from your video files you can do that in two ways:
To start the scene search, click the Start Detection button. When the search is done you will see the list of found scenes within the AVS Video Tools window: 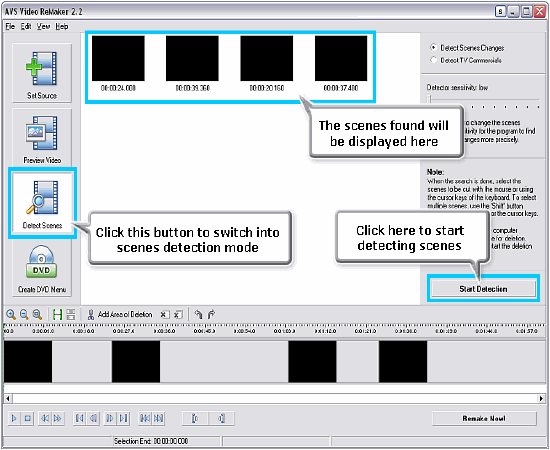 Step 4: Mark the scenes for deletion (optional) Click the scene you don't need in your video and after that use the Add Area of Deletion button to mark the scene for deletion. The scenes you want to delete will be colored in red: 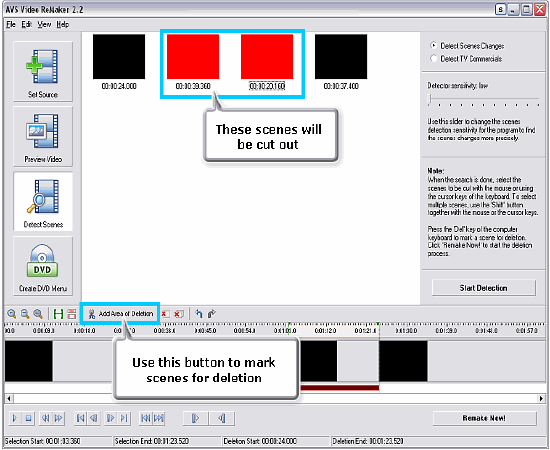 If you need to specify some scenes manually, you can do that using the player toolbar in the lower part of the program window and the Selection Range button. To add area of deletion, click the left mouse button within the timeline to select the beginning of the scene and without releasing it drag it to the ending limit of the scene. You can move the boundaries after that with the mouse. After you select an area, click the Add Area of Deletion button to mark this area as to be deleted from the video. Step 5: Merge your videos into a single file When all is ready, click the Remake now! button to open the Save File window:  Here you can select the output file Name, destination Path, video Format (if available). As you decide to save your video files into one, you must make sure that the Save all sections into a single file option is selected. The Burn movie to disc after processing option will be available with DVD video. When it is enabled, the AVS Video Tools will record the resulting files onto an optical disc using the internal burn engine. After that you will need to press the Start button and will see the deletion progress on the progress bar. It will take some time depending on the file length and your computer configuration. And that's just it - all your video files have now become a part of a single file. Free Download Trial is available, We hope you enjoy this guide! How to convert RMJ to MP3 How to write video DVD folder to DVD How To Bluetooth MP3s to Your Phone How to Transfer SMS from iPhone to Computer How to convert an address book to Thunderbird or Mozilla how to copy from AOL to Gmail How to export to Gmail and Google Apps How to put Contacts in Outlook in their own folder How to convert between all popular video formats How to convert an address book to/from Microsoft Excel How To Fix "NTLDR is missing" How to convert AOL address book to Gmail How to convert folders from Windows Address Book |
|
Submit Software |
Privacy Policy |
Terms of Use |
Advertise with Us |
Contact Us
Copyright ©  BestShareware.net. All rights reserved.
|